
Setting Up Rails TDD
The process of writing tests can be nerve-racking especially if you have to write them as you write code(TDD). I, however, bring with me the good news. There are tools that can greatly improve your test writing experience. These tools form a foundation on which your tests and ultimately code is built on, improving the experience you will have writing, reading, refactoring and debugging them. This post will take you through a basic yet powerful setup, that incorporates an interesting set of tools, to get you up and running the TDD way.
At Zegetech, rails and docker are an important part of how we make things happen. The resulting setup will, therefore, be for a rails application running on docker. If you don’t have a basic understanding of either rails, docker or ruby, you might want to check them out
Testing support was woven into the Rails fabric from the beginning. A test directory along with the respective files are created by default during app generation.
The helpers, mailers, and models directories are meant to hold tests for view helpers, mailers, and models, respectively. The controller’s directory is meant to hold tests for controllers, routes, and views. The integration directory is meant to hold tests for interactions between controllers.
By default, every Rails application has three environments: development, test, and production. Each environment’s configuration can be modified similarly. In this case, we can modify our test environment by changing the options found in config/environments/test.rb. A dedicated test database allows you to set up and interact with test data in isolation.
CHOICES
Like everything else that matters, tests are all about choices. Here are the important ones you’ll need to make;
Test framework
The framework of choice determines the format of the tests. Here’s a list of popular one for rails:
- minitest. Rails default testing framework. It is fast, clean and lets developers choose between Ruby test syntax and a Rspec-style DSL. Extra features such as test reporting and coverage are available through extensions
- rspecA DSL for writing tests. While most of the features offered by Rspec can be achieved with minitest through extensions, it might be a hassle when the number of extensions needed to get you up and running are too many. In such situations Rspec.
Test data
For good tests, you’ll need to give some thought on setting up test data. Test data refers to data that can be loaded and re-used throughout tests eliminating the need to manually enter data every time you run them.
- Fixtures. Rails default. They are not fine. Fixtures are not clear making it hard to read code and can get very tedious when more complex records are being maintained.
- Factory-bot. The better replacement. Factories allow for the definition of simple data schemas in one place and have a range of methods for manipulating the schema.
- Faker. Generates real-looking test data, and populates the test database with more than one or two records during development.
Test coverage
This refers the the fraction of tested code in an application.
- simplecov.It uses Ruby’s built-in Coverage library to gather code coverage data
Test Atomicity
- Database cleaner. The database cleaner contains strategies to cleanup the database after every test-suite
Time Travel
- timecop For time-dependeant tests. It provides “time travel”, “time freezing”, and “time acceleration” capabilities.
Testing external services.
- webmock. Library for stubbing and setting expectations on HTTP requests in Ruby.
- vcr. A gem that allows you to record your test suite’s HTTP interactions and replay them during future test runs for fast, deterministic, accurate tests.
Coding Styles
Style is important for writing quality code. In order to write quality code, it is recommended that the best practices found in The Ruby Style Guide are followed. Well-written Ruby reads like a natural language and can be understood even by non-developers. Moreover, well-written code is easy to maintain, modify, and scale. Here are some gems that we recommend to enable the process.
Debugging
Code is bound to have bugs. The process of debugging is made easy with the right tools.
- Pry-byebug Extends the functionality of the Pry and Byebug gems. With pry-byebug, you’re able to implement step-by-step code debugging by setting breakpoints. Pry-byebug allows you to set console (IRB or Rails console) breakpoints so you can check how a piece of code is executed at a certain point.
- letter_opener. A gem that lets you preview emails sent from your application through a browser before/instead of sending them. You will not have to send an catual email to see the output and make changes.
Security
- Brakeman A static analysis tool which checks Ruby on Rails applications for security vulnerabilities.
- Bundler-audit A tool that checks for vulnerable versions of gems in Gemfile.lock and insecure gem sources (http://).
Automation
- Guard. Automates various tasks by running custom rules whenever file or directories are modified. It’s used to help avoid mundane, repetitive actions and commands such as “relaunching” tools after changing source files or configurations. In the case of TDD, it will automatically run related tests when related files are edited.
- Capistrano A framework for building automated deployment scripts. Can handle a number of tasks including copying files, migrating databases, and compiling assets.
Performance.
- Bullet Notifies you of database queries that can potentially be improved through eager loading, when you’re using eager loading that isn’t necessary and when you should use counter cache.
SET UP
For our set up, we will use minitest, as the test framework, Factory-bot for test data schema, Faker to generate test-data, rubocop because we are all about clean readable code,pry-beybug and letter_opener to help us debug, both Brakeman and Bundler-audit for security, guard to automatically run our tests, simplecov for code coverage, database_cleaner for to clean the database after every test suite is run, webmock and vcr to speed up the external services dependant tests and finally bullet for optimization.
If you went through rails on docker post , you should be able to quickly set up a rails app on docker. Meaning you have;
- Generated a New Rails app.(Named app, if you chose a different name be sure to make the same changes for the commands i.e replacing app* with your app_name*)
- Connected it to the database.
We will now update the gemfile to contain the gems that will be used for this setup. The gemfile will be as follows;
# frozen_string_literal: true

source "https://rubygems.org"
git_source(:github) { |repo| "https://github.com/#{repo}.git" }

ruby "2.5.1"

# Bundle edge Rails instead: gem 'rails', github: 'rails/rails'
gem "rails", "~> 5.2.2"
# Use postgresql as the database for Active Record
gem "pg", ">= 0.18", "< 2.0"
# Use Puma as the app server
gem "puma", "~> 3.11"
# Use SCSS for stylesheets
gem "sass-rails", "~> 5.0"
# Use Uglifier as compressor for JavaScript assets
gem "uglifier", ">= 1.3.0"
# See https://github.com/rails/execjs#readme for more supported runtimes
# gem 'mini_racer', platforms: :ruby
gem "bundler-audit"
gem "devise"

# Use CoffeeScript for .coffee assets and views
gem "coffee-rails", "~> 4.2"
# Turbolinks makes navigating your web application faster. Read more: https://github.com/turbolinks/turbolinks
gem "turbolinks", "~> 5"
# Build JSON APIs with ease. Read more: https://github.com/rails/jbuilder
gem "jbuilder", "~> 2.5"

gem 'pry-byebug'
gem 'pry-rails'


# Reduces boot times through caching; required in config/boot.rb
gem "bootsnap", ">= 1.1.0", require: false

group :development, :test do
  # Call 'byebug' anywhere in the code to stop execution and get a debugger console
  gem "byebug", platforms: [:mri, :mingw, :x64_mingw]
  gem "bullet"
  gem 'simplecov'
  gem "factory_bot_rails"
  gem "faker"
  gem "guard"
  gem "guard-minitest"
  gem "letter_opener"
  gem "rubocop-rails_config"
  gem "timecop"
  gem "webmock"
end

group :development do
  gem 'brakeman'
  # Access an interactive console on exception pages or by calling 'console' anywhere in the code.
  gem "web-console", ">= 3.3.0"
  gem "listen", ">= 3.0.5", "< 3.2"
  # Spring speeds up development by keeping your application running in the background. Read more: https://github.com/rails/spring
  gem "spring"
  gem "spring-watcher-listen", "~> 2.0.0"
end

group :test do
  # Adds support for Capybara system testing and selenium driver
  gem "capybara", ">= 2.15"
  gem "database_cleaner"
  gem "selenium-webdriver"
  # Easy installation and use of chromedriver to run system tests with Chrome
  gem "chromedriver-helper"
end

# Windows does not include zoneinfo files, so bundle the tzinfo-data gem
gem "tzinfo-data", platforms: [:mingw, :mswin, :x64_mingw, :jruby]
With the updated gemfile we will need to install the new gems
$ docker-compose down && docker-compose build
Run the application
$ docker-compose up -d
What we want to do next is generate a scaffold for the application. In your terminal run:
$ docker-compose exec app bundle exec rails g scaffold recipe namestring ingredients:text process:text
NB if you come across the following error FATAL: Listen to error: unable to monitor directories for changes. Head over here for a quick fix.
Run migrations:
$ docker-compose exec app bundle exec rails db:migrate
Now let us configure the gem sets.
Rails default test framework is minitest so it is, good to go.
1. Factory_bot.
factory_bot_rails provides Rails integration for factory_bot.
You will notice a factory directory in the test directory after generating the scaffolds. This is because we added the factory_bot_rails gem in the gemfile. Otherwise, we would have manually created the directory and added the respective files. Next, we will configure our test suite to include factory_bot methods.
Edit the the test/test_helper.rb :
#test/test_helper.rb
    ENV['RAILS_ENV'] ||= 'test'
    require_relative '../config/environment'
    require 'rails/test_help'

    class ActiveSupport::TestCase
    # Setup all fixtures in test/fixtures/*.yml for all tests in alphabetical order.
    include FactoryBot::Syntax::Methods

     # Add more helper methods to be used by all tests here...
    end
By default, factory_bot_rails will automatically load factories defined in the following locations, relative to the root of the Rails project:
factories.rb
test/factories.rb
spec/factories.rb
factories/*.rb
test/factories/*.rb
spec/factories/*.rb
More information on how to customize and use the factories can be found in detail here.
2. Guard
Generate an empty guard file.
$ docker-compose exec app bundle exec guard init
A Guardfile will be generated in your app’s root directory. We will now edit the generated guardfile to watch our directories. Comment all the uncommented lines then comment out the Rails 4 section. This is because the directory structure for rails 5 is similar to that of rails 4. The final guardfile:
    guard :minitest do
   #commented code
  # Rails 4
  watch(%r{^app/(.+)\.rb$})                               { |m| "test/#{m[1]}_test.rb" }
  watch(%r{^app/controllers/application_controller\.rb$}) { 'test/controllers' }
  watch(%r{^app/controllers/(.+)_controller\.rb$})        { |m| "test/integration/#{m[1]}_test.rb" }
  watch(%r{^app/views/(.+)_mailer/.+})                    { |m| "test/mailers/#{m[1]}_mailer_test.rb" }
  watch(%r{^lib/(.+)\.rb$})                               { |m| "test/lib/#{m[1]}_test.rb" }
  watch(%r{^test/.+_test\.rb$})
  watch(%r{^test/test_helper\.rb$}) { 'test' }
  #commented code
end
fire it up
$ docker-compose exec app bundle exec guard #while the container is running
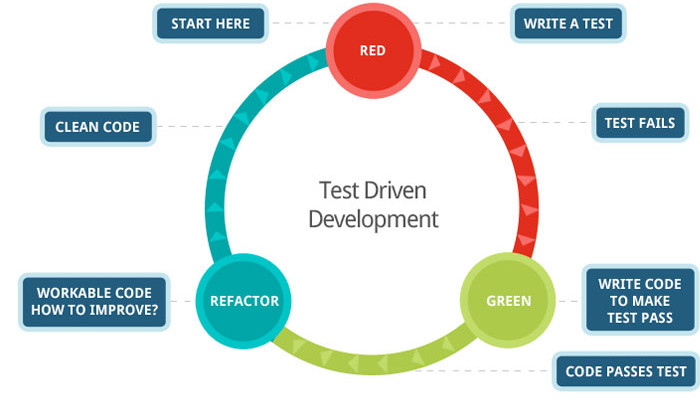
As is the way of TDD:
Hello failing tests :(
You will need to write methods to get the tests to pass and so on…As is stipulated in the TDD-nstitution. More information on the configuration customization of guard can be found here
3. Rubocop
Generate the file.
$ docker-compose exec app rails generate rubocop_rails_config:install
Fire it up
$ docker-compose exec app rubocop
23 files inspected, 90 offenses detected!!
Auto-correct offenses?
$ docker-compose exec app rubocop -a
23 files inspected, 90 offenses detected, 90 offenses corrected
Because rubocop can be a bit noisy, You can check out the official configuration options to quiet it down to your liking.
4. Brakeman
As earlier stated brakeman is a tool that checks Ruby on Rails applications for security vulnerabilities. Unlike most web security scanners, brakeman checks for security vulnerabilities in the source code and one needs not to have the whole application running before getting results. In line with TDD, one can check for vulnerabilities as they continue to build up their applications.
Running breakman is pretty straight forward.
$ docker-compose exec app brakeman
And No warnings found. We are safe, for now.
5. pry-byebug
If you haven’t noticed, in our Gemfile pry-beybug has been included globally, this is because pry might prove an asset when debugging the application during production. You will also notice the gem pry-rails right below it. Pry-rails is basically an initializer saving us the trouble of having to require pry in every file where we need to use it.
Because we already installed the gems we can now invoke pry at any point of our code and see the breakpoints.
And this can be done in the guard console.
Add
binding.pryin any test method then run guard to see the magic.
6. bundler-audit
With the gem already installed, bundler-audit is ready to go. Run bundler-audit to check for vulnerable versions of gems and insecure gem sources. And the best part? It does not require a network connection
$ docker-compose exec app bundle audit
7. simplecov
We will load simplecov by requiring it in test/test_helper.rb.
Head off to test/test_helper.rb and at the very top add require "simplecov"
#test/test_helper.rb
require "simplecov"
We then launch it. In test/test_helper.rb
#test/test_helper.rb
require "simplecov"
SimpleCov.start
Save the file and run the app.
$ docker-compose up -d
Run the tests, through guard.
$ docker-compose exec app bundle exec guard
The coverage file is generated in the coverage directory.
You will need to omit the coverage directory from version control. In your .gitignore file add the following;
#.gitignore

/coverage/*
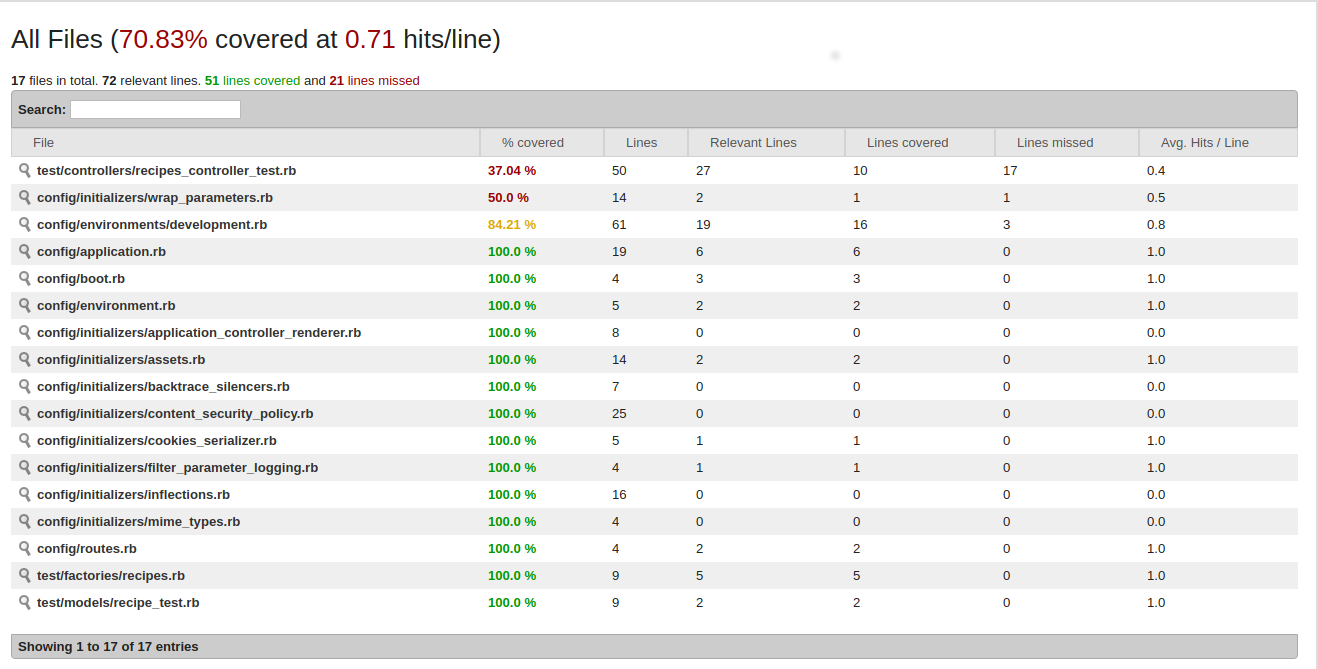
Run the coverage/index.html file in your favourite browser to see the coverage. This can be done in the terminal using the command below if you are using chrome.
$ cd coverage && google-chrome index.html
…
8. Database Cleaner
To configure the database cleaner we will need to load it.
In the test/test_helper.rb require the database cleaner module.
#test_helper.rb
#...everything else reamins
ENV["RAILS_ENV"] ||= "test"
require_relative "../config/environment"
require "rails/test_help"
require "faker"
require "database_cleaner"

#.. everything else remains
Select the strategy to use, In this case we will use the recommended transaction strategy.
#test_helper
#..everything else remains

ENV["RAILS_ENV"] ||= "test"
require_relative "../config/environment"
require "rails/test_help"
require "faker"
require "database_cleaner"
DatabaseCleaner.strategy = :transaction

#...everything else remains
We will need to start a database_cleaner transaction with every test setup and end it with every teardown.
Because we can’t have multiple setup/teardown methods with minitest, we essentially have to call the database_cleaner’s start and clean method in every setup and teardown method, respectively. This is okay but it would be breaking the DRY(Don’t Repeat Yourself) rule. A workaround for this would be the minitest-around gem, which adds support for multiple setup/teardown methods. For this particular project, however, we will not use the extra gem. Instead we will use inheritance.
In the test/test_helper.rb
#test_helper
#.. everything else reamins

module AroundEachTest
  def before_setup
    super
    DatabaseCleaner.start
  end

  def after_teardown
    super
    DatabaseCleaner.clean
  end
end

#...everything else remains
Then include the module in the helper class
#test_helper.rb

class ActiveSupport::TestCase
  #setup all fixtures in test/fixtures/*.yml for all tests in alphabetical order.
  include FactoryBot::Syntax::Methods
  include AroundEachTest

  #......

end
The final test helper file
# frozen_string_literal: true
require "simplecov"
SimpleCov.start

ENV["RAILS_ENV"] ||= "test"
require_relative "../config/environment"
require "rails/test_help"
require "faker"
require "database_cleaner"
DatabaseCleaner.strategy = :transaction

module AroundEachTest
  def before_setup
   super
   DatabaseCleaner.start
  end
  def after_teardown
   super
   DatabaseCleaner.clean
  end
end

class ActiveSupport::TestCase
  # Setup all fixtures in test/fixtures/*.yml for all tests in alphabetical order.
  include FactoryBot::Syntax::Methods
  # Add more helper methods to be used by all tests here...
  include AroundEachTest
end
9. Letter Opener
To configure letter opener we will first set the delivery method in config/environments/development.rb
Rails.application.configure do
  # Settings specified here will take precedence over those in config/application.rb.
  config.action_mailer.delivery_method = :letter_opener
  config.action_mailer.perform_deliveries = true
  # In the development environment your application's code is reloaded on
  # every request. This slows down response time but is perfect for development
  # since you don't have to restart the web server when you make code changes.
  #...everything else remains
end
Now any email will pop up in your browser instead of being sent. The messages are stored in tmp/letter_opener.
10. webmock
To setup webmock, we simply require it in the test/test_helper.rb file.
#...rest of the code remains code remains
  ENV["RAILS_ENV"] ||= "test"
  require_relative "../config/environment"
  require "rails/test_help"
  require "faker"
  require "database_cleaner"
  require "webmock/minitest"
#...rest of the code remains
For details on how to use webmock can be found here
11. vcr
We will setup vcr to use webmock.
To do this we will first need to require it in the test/test_helper.rb file.
#test_helper.rb


# ..existing code unchanged
  require "vcr"
# ...existing code remains
Configure the directory where vcr will record the request and also configure vcr to hook into webmock. In the test/test_helper.rb add the following configuration.
#test_helper.rb

# vcr configuration
VCR.configure do |config|
  config.cassette_library_dir = "test/vcr_cassettes"
  config.hook_into :webmock # or :fakeweb
end
create the directory
$ mkdir test/vcr_cassettes
And that’s it.
We can now test it by adding a sample test in our test/test_helper.rb file.
# test_helper.rb


  class ActiveSupport::TestCase
    # Setup all fixtures in test/fixtures/*.yml for all tests in alphabetical order.
    include FactoryBot::Syntax::Methods
    # Add more helper methods to be used by all tests here...
    include AroundEachTest

    def test_example_dot_com
      VCR.use_cassette("synopsis") do
        response = Net::HTTP.get_response(URI('http://www.iana.org/domains/reserved'))
        assert_match /Example domains/, response.body
      end
    end
  end
Run the tests
$ docker-compose exec app bundle exec guard
The request will be recorded. You should be able to see the record in test/vcr_cassettes/synopsis.yml file.
More details on how to use vcr can be found here
12.Bullet
We will need to add the following bullet configurations to:
- Enable it
- Enable JavaScript popup alerts in the browser
- Enable bullet to log in app’s logs, i.e
log/bullet.log. - Enable bullet log warnings in browser’s console.log
In config/environments/test.rb add the following code.
    config.after_initialize do
      Bullet.enable = true
      Bullet.alert = true
      Bullet.bullet_logger = true
      Bullet.console = true
    end
Head over to the repo for a full demo.
The final setup can be found on github.