
Creating a CI/CD pipeline for Jekyll

Prerequisites:
- A Jekyll site or simply the Jekyll boilerplate. Read part one.
- A basic understanding of Git. We are going to use for version control.
- A Github repository containing the Jekyll site.
- An account with Travis.
- An account with firebase.
- Give your environment a quick test run to make sure you’re all set up.
What is Continuous Integration and Continuous Deployment?
Continuous Integration (CI) is a development practice that involves the aggregation of small bits of code into a shared repository, frequently.
Continuous Deployment is closely related to Continuous Integration. It refers to the release to production of a software that passes set automated tests. In other words it means frequently making the most recently functional version of a software available for use.
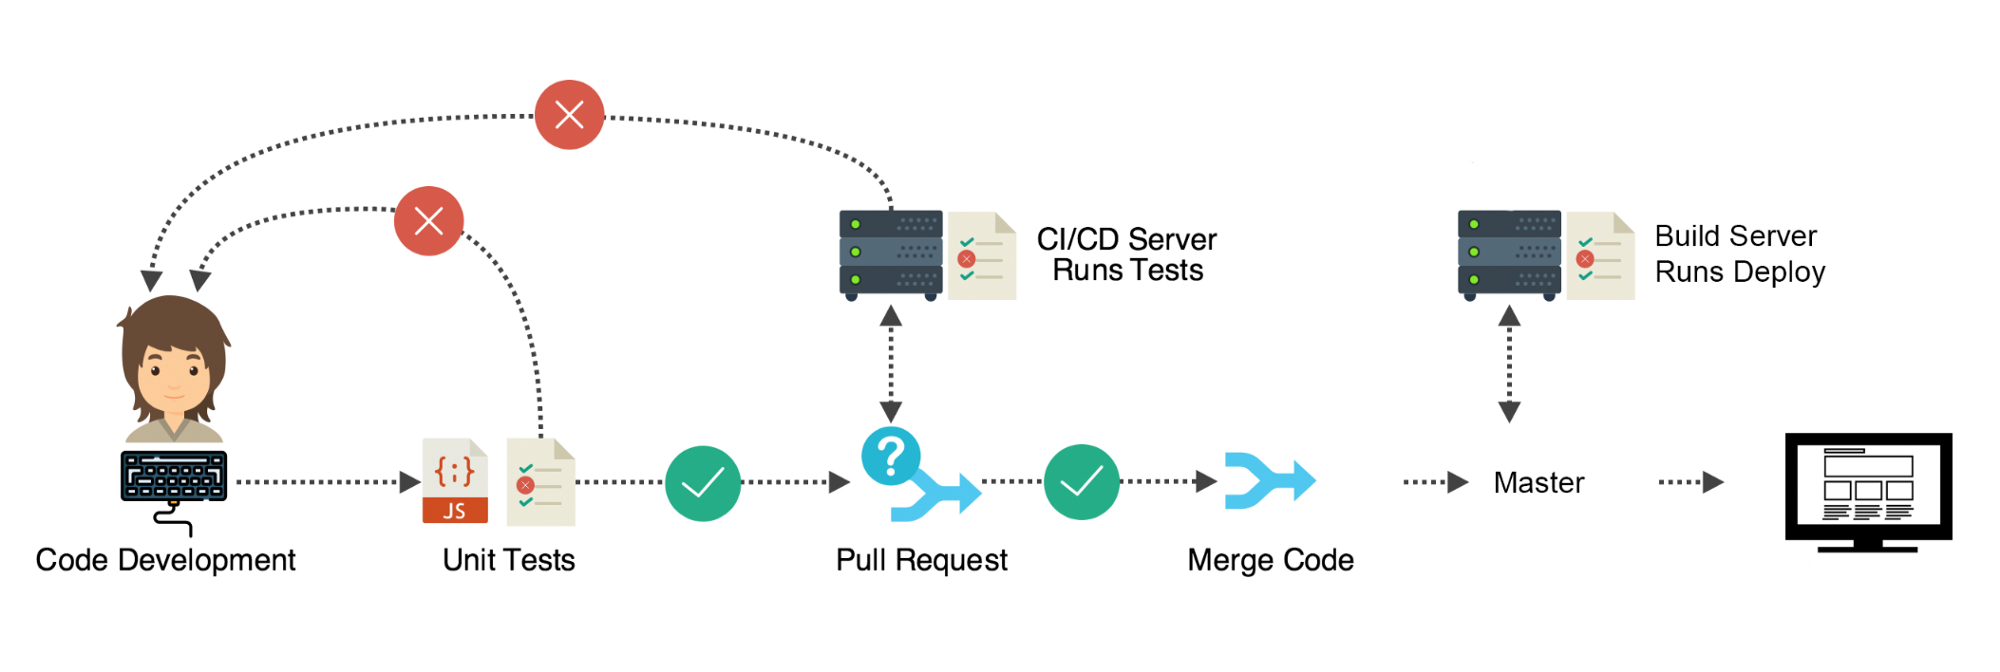
A development process is considered to follow continuous integration and continuous Deployment when the following practices are applied throughout the development process.
- It maintains a single source repository
- It integrates automated builds for the project.
- It contains a self-testing mechanism for the project’s builds.
- It contains automated deployment.
Now let’s incorporate continuous integration and continuous deployment practices for our Jekyll site.
1. Maintain a single source repository
We will do this by pushing the project to github following gitflow workflow. Now anyone who wants to contribute to the project, or is part of the team, will clone/fork this repository.
2. Integrate automated builds for the project
For this, we are going to use a continuous integration tool. There are many Continuous Integration tools out there. Here’s a list of the most common ones. For this article, we are going to use Travis.

Now add a blank .travis.yml file to the root of your repository.
This file tells Travis CI what to do.
Now to the travis.yml file add the following.
language: ruby
node_js:
    - "8.10"
rvm:
    - 2.5.1
install:
    - gem install jekyll bundler
before_script:
    - bundle install
script:
    - bundle exec jekyll build
branches:
    only:
        - release
        - Develop
        - master
after_success:
    - echo "Build was successful"
What have we just done?
We have told Travis what language our project is built on, ruby.
language: ruby
We asked it to install a version of node version ‘8.10’.Later in the article, we will come to why we need it.
node_js:
    -"8.10"
Then using rvm, a package manager, we specified the ruby version that Travis will use for the builds.
rvm:
    -2.5.1
We then had Travis install Jekyll and bundler.
install:
    - gem install jekyll bundler
Then had it install the gems in the gemfile. The before_script command is to inform Travis that this should be done before running any scripts.
before_script:
    - bundle install
Then we told Travis to run a command in its console. The bundle exec Jekyll build. Note, if you don’t add this step, Travis will add a default step tagged test. Since we don’t have any tests, the build will fail.
script:
    - bundle exec Jekyll build
We then specified the branches on which we wanted the above build to be done on. The Develop, master, and release branches. You can change these to the branches you have.
branches:
    only:
        - release
        - Develop
        - master
We then added an optional step, after_success. This means, quite obviously, that after a successful build we want Travis to print out a string, "the build was successful".
after_success:
    - echo "Build was successful"
Now when you log in to your Travis account and activate the repository. Great, now push some changes to GitHub. Automated builds!!!
3. Contains self-testing mechanism for the project’s builds.
Now that we have automated builds, we want to add a self-testing mechanism. Now the build itself can be considered a test. A test whether the site actually builds. For this article though, we are going to add another test. We are going to test the resulting site. Since this is a static site, we are going to test the HTML. For that, we are going to use the html-proofer.
Back to our Travis file.
We will have Travis install the html-proofer gem.
Now update your install script in your .travis.yml file to look like so:
*----rest of code remains---*

install:
    - gem install jekyll bundler
    - gem install html-proofer

    *---rest of the code remains----*
The above only installs the gem. To use it we update the .travis.yml to contain the script to run the HTML-proofer like so;
script:
    - bundle exec jekyll build
    - bundle exec htmlproofer ./_site
The ./_site tag is to avoid testing external sites.
Great, now you can make a few changes, push them and see what happens.
4. Contains automated deployment.
To add automated deployment we will need to add a deployment step. At the bottom of your .travis.yml file. Add this:
deploy:
    provider: firebase
    skip_cleanup: true
    token:
        env: $FIREBASE_TOKEN
    on:
        branch: release
The provider key tells Travis where we are going to deploy our site, firebase. Travis will install all the dependencies required to deploy to firebase.
The skip_cleanup always defaults to false if not specified. This means Travis by default cleans up after a build. Travis automatically resets your working directory by deleting all changes made during the build.
Since the directory is what we want to deploy, we want Travis to skip the cleanup. We do this by setting it to true.

In order to deploy, Travis needs access to the provider account, in this case firebase. The token allows deployment to firebabse using the ci api. Here we have told Travis to use the environmental variable FIREBASE_TOKENwhich we will set in the travis settings.
The env key simply tells Travis to obtain the key from an environment variable.
A firebase token is a token generated through the firbase ci login
firebase login: ci
The on key sets your build to deploy only from specific branches.
In our case from branch release.
Great. So this is what the final .travis.yml file looks like.
language: ruby
node_js:
    - "8.10"
rvm:
    - 2.5.1
install:
    - gem install jekyll bundler
    - gem install html-proofer
before_script:
    - bundle install
script:
    - bundle exec jekyll build
    - bundle exec htmlproofer ./_site --disable-external
branches:
    only:
        - release
        - Develop
        - master
after_success:
    - echo "Build was successful"
deploy:
    provider: firebase
    skip_cleanup: true
    token:
        env: $FIREBASE_TOKEN
    on:
        branch: release
Now create a PR against the release branch, if the tests pass merge to see your site deployed. You have now successfully created a CI/CD pipeline for a Jekyll site.
GitHub Pages

You can also deploy your site to Github pages. There are a number of benefits to using GitHub pages for your static site.
- No installations.
- Setting up is easy.
- It is completely free.
The downside to deploying Github pages being that it can only be used for static content.
If you choose to host your site on GitHub pages, you’ll have to edit your .travis.yml’s deploy step to something like this.
    deploy:
    provider: pages
    skip_cleanup: true
    github_token: $GITHUB_TOKEN
    on:
        branch: release
Here’s a link to help you get a github token.
A few Github Pages Gotchas
There are, however, a couple of things to note when deploying to GitHub pages.
-
GitHub pages ignore/disable certain plugins and themes during their Jekyll build process. These plugins function locally but do not work on GitHub pages such as octopress-paginate used on the Zegetech site. Here’s is a list of allowed or whitelisted plugins and themes.
-
Another workaround would be to install pages-gem which helps GitHub Page’s users bootstrap and maintain a Jekyll build environment that most closely matches the GitHub pages build environment. With this, if it works locally you are sure it’ll work on Github pages.
-
You are not required to install
Jekyllseparately If you decide to usegithub-pages gem. This is because Jekyll 3.7.4 is a runtime dependency for the github-pages gem. If you have a different version of Jekyll installed then there may be discrepancies between your site run locally and the same site hosted on github pages.