
Static Sites are back

Remember your first website? I want to assume you started off, like most developers, by creating a series of HTML files linking within it images, CSS and perhaps a sprinkle of JavaScript. Files load on your browser and that was it!!. No web server required. Life was simple!!!
With more experience and possibly changing times, there came a need to create larger, more complex websites. Creating and managing them as single static files became tiresome and prone to errors.
Take the example of a navigation bar and a footer, similar on every page. If a change is made on either of the components in a single page, the remaining pages would need to be updated. This would mean directly editing each one of the files and then using our beloved Filezilla to update the web server. Like I said tiresome!!
…Then came content management systems (CMS)
Content Management Systems basically display page content from a database. The content is displayed within its designed shell and theme page. Examples include Wordpress, Magento, Joomla, Drupal…
Here’s how they work:
- Determine which page is required.
- Requests appropriate content from the database.
- Loads an HTML template (normally from the file system).
- Renders the content within the template.
- Returns a formatted HTML page to the visitor’s browser.
Problem Solved well… not entirely.
CMS create a new set of issues.
- You need to adhere to the CMS’s way of working. Adding custom text or components can be a little awkward.
- The server is doing more work, and performance can, therefore, be affected.
- There are additional points of failure. A software upgrade or database failure can bring your site down.
Static sites came back…with a twist!
A Static Site Generator(SSG) is a compromise between using a hand-coded static site and a full CMS while retaining the benefits of both.
In essence, it generates a static HTML-only website using CMS-like concepts such as templates. The content can be extracted from a database but, more typically, markdown files are used.
It creates web pages through a series of customizable templates and user data entry. Static sites generate pages when the owner makes changes to them and hosts the page as a pre-made set of HTML, CSS, and JavaScript files. This contrasts CMS-based sites, which look for updates and build pages when a visitor accesses them.
Static site generators essentially abandon updating websites through a back-end system and do not require server processing to generate pages. Instead, generators create and update pages through an editor and save the updated versions to the hosting platform.
The good
1) Blazing fast
Perhaps the most immediately noticeable characteristic of a static site is how fast it is. As mentioned above, there are no database queries to run, no templating and no processing on every request.
2) Security
Platforms like WordPress are used by millions of people around the world, meaning they’re common targets for hackers and malicious attacks. Wherever there’s user input/authentication or multiple processes running code on every request, chances are there’s a security hole to exploit. For management, site administrators need to keep patching their systems with security updates. Static sites keep it simple since there’s not much to mess up when there’s only a web server serving plain HTML pages.
3) Traffic surges
Unexpected traffic peaks on a website can be a problem, especially when it relies intensively on database calls or heavy processing. A static site is generally better prepared for those situations, as serving static HTML pages consumes a very small amount of server resources. It also benefits greatly from Content Distribution Networks, CDNs, to increase availability and speed
4) Client Control Considerations
Using a CMS is not necessarily easy, and it offers considerable power to content editors. You can lock down rights such as plugin installation, but it won’t stop changes to things like font, colors, corrupting the layout etc. A static site can use Markdown files. This limits the user’s options; they make fewer mistakes and cannot adversely affect the pages.
5) Developer friendly, Client friendly
Many developers shun at the thought of building a website… why, because developers want to code, not do data entry in a CMS and call that web design. That’s why SSG brings the developer workflow back to designing websites and provides avenues for automation such as CI/CD deployments. For the non-developer customer, they too can create user-generated content through various services and plugins that facilitate seamless integration. Best of both worlds
The better
The continued success of Static site generators can be attributed to the ability to separate the build phase of the site from the actual hosting of it.
An architectural approach called the JAMstack.
The JAMstack is a way of building websites and apps that deliver better performance, higher security, lower cost of scaling, and a better developer experience.
A project is built with JAMstack if it meets the following criteria :
Javascript: Any dynamic programming during the request/response cycle is handled by JavaScript, running entirely on the client. This could be any frontend framework, library, or even vanilla JavaScript.
APIs: All server-side processes or database actions are abstracted into reusable APIs, accessed over HTTPS with JavaScript. These can be custom-built or leveraged third-party services.
MarkUp: Templated markup should be prebuilt at deploy time, usually using a site generator for content sites, or a build tool for web apps.
![]()
Now that that’s settled am sure you want to get started with a static site generator. With the whole lot of available options like Hugo, Hexo, Gatsby, NUXT, MkDocs, Jekyll…etc you are probably wondering which one you should use.
Try Jekyll. A mature product, with a huge support community. Jekyll is natively supported by GitHub pages, which is a big bonus.
Jekyll has everything you need and nothing you don’t to get started with your website.
- It is fast
- It is flexible.
- It is blog-aware.
The Zegetech site is built on Jekyll. Navigate around to see what I mean.
Getting started with Jekyll
Requirements:
- Ruby version 2.2.5 or above, ruby version can be checked by running ruby -v)
- RubyGems (which you can check by running gem -v)
Setup is relatively straightforward.
Run the following commands on your terminal
- Install Jekyll and bundler gems.
gem install bundler jekyll - Create a new Jekyll site.
jekyll new my-site - Change into your site’s directory.
cd my-site - Build the site and make it available on a local server
bundle exec jekyll serve
Now browse to http://localhost:4000 to see your brand new boilerplate Jekyll website
Directory structure
On installation, a jekyll site usually looks something like this:
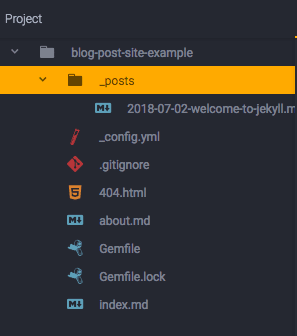
-
_config.yml- manages settings for the entire site or blog. ie:- Global variables on the site.
- The configuration of collections or defaults.
- Specification of runtime variables that you want Jekyll to run every time.
-
_post- The blog content goes here. The naming convention of these files is important and must follow the format:YEAR-MONTH-DAY-title.MARKUP -
.gitignoreThe paths to the files you want to exclude go here. -
_siteThis is where Jekyll puts the entire static site after the build. -
404.html- Page displayed when one tries to access a broken link on your site. If you know how to create a single page template, you have the option of customizing this page. -
Gemfile- A Gemfile is Ruby’s dependency management system or in other words, a list of Gems a Ruby project needs to run.
What is a gem? A Gem is a bundle of code we can include in Ruby projects sort of like an extension. This allows us to take someone else’s code and drop it into our own project. Gems can implement functionality such as:
- Converting a Ruby object to JSON
- Pagination
- Interact with APIs such as Github
Jekyll itself is a Gem as well many Jekyll plugins including jekyll-feed, jekyll-seo-tag, and jekyll-archives.
-
Gemfile.lock- This file is auto-generated and includes all the Gems in Gemfile with the addition of a version number even if it wasn’t specified. This ensures that other people we share the source code to will have the same version of the gems. -
index.md- Provided that the file has a front-matter section, it will be transformed by Jekyll. The same will happen for any.html,.markdown,.md, or.textilefile in your site’s root directory or directories not listed above.
Others As you grow and start building more complex sites with jekyll, you will find the need to switch up the directory structure to accommodate all your interesting features. Here are a few directories that are commontly added;
_layouts- As the name suggests, this is where you put you custom page layouts. The basic description for the placement of the site’s content.
_includes- Page snippets which can be included throughout the site. Includes are often used for page sections which are duplicated across the site like a header, footer, navigation bar, forms etc…
_drafts - This is where posts that are not ready for publishing are put. The files in this directory need not have a date in the filename. To preview your site with drafts(posts in the draft folder), run Jekyll serve or Jekyll build with the --drafts switch.
Jekyll provides a number of other different ways to manage the said future posts.
-
One would be to include the
published: falsetag in the post’s front matter for posts you do not want to show up in the generated site. With this method, to preview your site locally, you can runJekyll serveorJekyll buildwith the--unpublishedoption. -
Another workaround would be to add your posts with future dates. To preview the future posts, in this case, you can run
Jekyll serveorJekyll buildwith the--futureoption. Make sure to addfuture: falseto config.yml. Great now run Jekyllbundle exec jekyll serve
Streamline the Writing Process
Writing content for a Jekyll site involves both writing the content and the configuration(front-matter) for how the content will be handled.
It is easy, especially when getting started to forget important bits that Jekyll requires in order to properly generate your pages.
A common omission is the date part in the filename for posts or the layout: in the front-matter resulting to ‘missing’ posts or in the latter case an improperly formatted page.
jekyll-compose is a Jekyll plugin to help ease these pains.
Jekyll-compose extends the Jekyll CLI with five commands; draft, post, page to create their respective content, publish and unpublish to move content between the _posts and _drafts directories.
To install the plugin, we first add it to the :jekyll-plugins group in our Gemfile:
group :jekyll-plugins do
  # other plugins
  gem "jekyll-compose"
end
Then install with bundle install.
We should now be able to generate a new post with; bundle exec jekyll post "new post title".
This will add a properly named file to the _posts directory.
The plugin sets some default front-matter including the title and date. We can configure extra metadata in the _config.yml file under the jekyll_compose key.
jekyll_compose:
  post_default_front_matter:
    layout: blog
    categories:
    published: false
    author:
    blog-image:
    intro:
With this set-up, you will be guaranteed that all your posts have the expected structure. This is especially useful while working with multiple contributors.
Resources:
This is simply an introduction to get you started. Below is a list of resources that will get you more acquainted with Jekyll.
Watch out for Part 2 of this article where we’ll talk about: Creating a CI/CD pipeline for a Jekyll based website.