
Deploying a production ready monolithic rails application

Photo by Pedro Lastra on Unsplash
So, you finally have your app in a state that you aren’t too embarrassed to show off. How do you open it up to the world? How do you manage the influx of users? How will you keep it safe from the dangerous internets? These are questions we face every time we work on a new product. This post explores one of the ways to deploy your shiny new rails application and the common tooling behind it.
Monolithic?
If this invokes an image of the stone pillars at stonehenge, good. An app built on the monolithic architecture is easily viewed as one integrated piece.
The database, business logic, API and user interface components are all worked on within the same codebase, and deployed as a whole.
If you have built a rails app following the introductory guide you will end up with a monolith.
Heres the directory structure you get when you initialize a rails application with rails new [appname]:
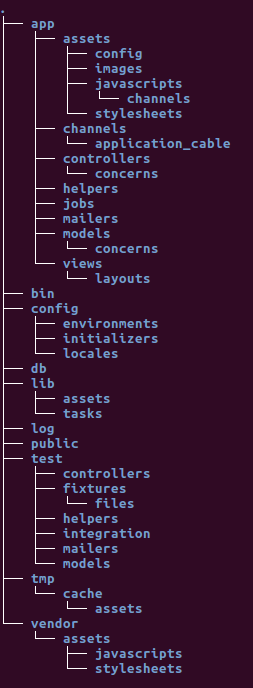
Everything that constitutes your app will be found within this one folder. User interface components? You’ll find that in app/views.
Data models? That’s in app/models. How you get data onto your user interface? app/controllers.
That’s the typical MVC framework setup.
You will have heard of micro-services in the last few years. If not, here’s an intro. The micro-service architecture encourages the development of applications as disparate services, with each service catering to a single business requirement. Each service publishes an api through which other services can consume its data. A single service can be viewed as a monolith application, albeit with reduced business scope. We’ll cover deploying a traditional rails app in this post, and follow it up with deploying a micro-services based app in a later post.
Application Environments
Every application typically exists within several environments. You have your development machine, a CI/CD server, plus one or more staging and production servers. Rails configures 3 environments for us when we start a new application. Test, staging and production. We are at liberty to add to these environments to align with our application needs. Deploying our app on multiple environments allows us to test how it behaves on each, and most important, prevents us from breaking code in production.
Continuous delivery requires that we deploy our code as often as possible. When to start? I’d say as soon as you have the boilerplate ready. Why?
- It gives you a ready avenue to present work to the client or customer as the product evolves.
- Gives you the opportunity to test and understand your production requirements from day one. You avoid getting hit by strange bugs right when the product is ready to launch.
- And finally, what better way to keep motivated than to actually be losing money with every delay in releasing the product?
Deployment options
Unless you are lucky enough to work in a server room and have one of those servers as your development machine, you will need somewhere to host your site. We have the choice of deploying our site to a PaaS provider such as Heroku or using a VPS from a IaaS provider. This can also be a combination of the cloud services discussed here.
Deploying to a platform such as heroku abstracts away the complexities of setting up a performant and secure environment for your application. No need to worry about setting up and updating the OS, the database server or any of your app dependencies. You simply upload your code and the platform takes care of the rest.
The more painful approach is to create a VPS on a provider such as Digital Ocean, Linode or AWS Lightsail. With a vps, you control every aspect of the server. If something fails, that’s on you. The process of setting up is not much different from what you did to get the app running on your development machine. But, on top of getting your app to run, you have to make considerations for overall site security and app performance. Why would anyone want to do it this way?
- Total control over your server - install everything you want and nothing more to help reduce the attack surface. Optimise your server for performance or security as you see fit, or even ‘gain’ a bit more memory by allocating swap.
- Cost - you only pay for resources, not management. Consider that postgres on Heroku, if you go beyond 10k records(which you will), is 9$ per month. With a vps on the other hand, if you’re paying 5$ per month, it will still be 5$ with a full-blown postgres install.
And you guessed it… we’re going with the painful approach.
Setting up the Production|Staging Environment
-
Base Environment
You will mostly get your pick of operating system with most cloud providers. And here is where the choices start. We will be going with Ubuntu 18.04(Bionic Beaver). This is an LTS(long term support) version of Ubuntu with at least 5 years of security support. Unless your deploy will be short lived, make sure to choose an OS with guaranteed updates.
-
User Setup
When you create a new server with the cloud providers defaults, you mostly receive a root password in your email. You can then log in to the server as the root user. This base setup is insecure. If your password was to fall into the wrong hands, your server would no longer be yours! Running as the root user also does not leave room for error. There will be no prompts warning you when you try to remove a critical system file.
It is recommended practice to always create a deploy user and use SSH key authentication to log in to your server. The deploy user should be a normal system user who can gain super-user privileges with
sudo. You can refer to this article for an explanation and step-by-step.An alternative to performing these steps after your server has been built is to provide a script that the cloud provider will run as part of the provisioning task. This is referred as User data on Digital Ocean while AWS Lightsail asks for a launch script. Here’s an example script. User data is fed into CloudInit which runs the provided commands as root the first time the server starts.
To completely skip setting up password login to the server, you can provide your SSH public key to the host server to allow your local machine to SSH it. To generate an SSH key on your linux local machine run:
ssh-keygenThis will generate a public/private key pair and save to
id_rsa.pubandid_rsarespectively, in~/.ssh/. You can view the contents of your public key using:cat ~/.ssh/id_rsa.pubYou can then copy the printed key onto your cloud provider’s dashboard to have it available everytime you create a new server. For a general walkthrough on setting up ssh, see this post
-
Basic network security setup
The internet can be a scary dangerous place. This becomes obvious within hours of provisioning a new server. The number of failed login attempts that show up in my server logs is just insane. A firewall is the first line of defence for your server.
UFW(uncomplicated firewall) on ubuntu gives us an interface to setup rules for how our server handles traffic. We can choose to only leave open the few ports we will be using;80and443for the webserver,22for ssh. We can also filter based on network protocol,tcporudp, ip ranges and much more. This article shows how to get a basic setup going.Fail2ban is the next tool we will want to set up. Fail2ban provides some protection against brute-force attacks on your site. It can detect repeated failed authentication attempts and automatically ban the offending ip for a set time. This has the added advantage of saving your server resources that would have been consumed replying to these attempts.
-
Server components
- Web server - Nginx is a high performance web server with powerful reverse proxy features. We will be setting up Nginx to serve static files (html, css, images…) for our site, while forwarding all other requests to Puma. The rails documentation provides a sample configuration file.
- Application server - Puma is the default server for rails apps and what starts when you run
rails serveron your development machine. There is thus no special effort required to install and run puma. It also comes with sensible defaults that can be applied in production. - Cache and Queues - Redis is an in-memory key-value database normally used in rails applications to provide a job queue and for caching. In the context of our application, it is a requirement for sidekiq. Caching helps speed up our server response times by storing the results of database queries in RAM and serving subsequent requests from this stored data. In earlier years, for caching, memcached was the prefered choice due to its speed and robustness. However, Redis has come a long way since then, making it the prefered caching solution, and keeping dependancies one less!!!
- Sidekiq - is a popular background job scheduler for ruby applications. Rails provides a default job scheduler but that is really only meant for development as holds its jobs in RAM, thus all enqueued jobs are lost when the server shuts down. Sidekiq persists jobs between server restarts. Support for sidekiq is also baked into rails and can be configured as shown here.
- Database - database setup for whatever backend you choose to use in production will mostly be the same as your local setup. Of particular importance is to make sure that your database is protected behind a password and that the db port is not open to the outside world. Here’s how you can secure your postgres installation.
The Rails Environment
If it’s not obvious by now, there are a lot of moving parts before we have a production ready environment. All that work and we haven’t installed Ruby yet! And even after we have everything installed, how do we get our code onto the server. Will we have to ftp, scp, sftp and more p’s into the server everytime we want to deploy a new version of our code? No, no we won’t. For deploying ruby applications, we have Capistrano.
Capistrano
A remote server automation and deployment tool written in Ruby.
Capistrano allows us to write tasks that define our entire (almost) deployment workflow and then perform those tasks on any number of servers.
cap builds upon rake “Ruby Make”, adding the functionality necessary to connect to and run code on remote servers.
The cap SSHKit toolkit provides most of capistrano’s functionality, and has useful examples.
Various gems are available to integrate capistrano with rails applications:
- capistrano/rails - common rails deployment tasks
- capistrano/rvm - integration with RVM managed ruby environments
- capistrano/bundler - integration with bundler
- capistrano/puma - tasks to manage the puma application server
With cap added to a rails application, a cap [environment] deploy is all we need to run to deploy a new version of our site.
Capistrano also provides the ability to rollback a deploy if the most recent one breaks.
That by itself is reason enough to capify all the things.
Since cap connects to the server via SSH, we can use it to run any command as we normally would on the server.
By writing tasks, scripts that list the commands to run, both locally and on remote servers, we can automate the process of setting up our server.
One only needs set up the server once, while extracting the logic out into cap tasks.
In this way, we can have a tasks to install postgres, another for nginx, one to create a database role, one to update the system, and so on.
Once you have the scripts together, provisioning a new server stops being a pain. But how do you get those tasks into a different project?
Rails application templates is how.
Rails application templates provide a way to add ‘code’ to a new or existing rails application.
The DSL provides actions to add gems and sources to the Gemfile, add initializers, rake tasks and arbitrary files.
We can set rails configuration variables or even run rails and git commands as the template is applied.
We can use Thor actions to fetch and manipulate data from disparate sources for use in our cap tasks.
To generate a new application and apply the template we run:
rails new [appname] -m /path/to/template.rb # path can also be a url
Or to apply to an existing app:
bin/rails app:template LOCATION=/path/to/template.rb # location variable can also be a url
Example you ask? Introducing Rails seed

Photo by Christian Joudrey on Unsplash
Rails seed is a Rails Application Template, developed within Zegetech with the lofty goal of getting you up and running a production-ready environment in 15 minutes. And it works… mostly. If nothing else, it should give you a more concrete image of the jumble written here. The template contains tasks that take care of installing the typical ruby and rails dependencies, setting up postgres, adding firewall rules and most other setup tasks.
The template for now works for Rails 5.0 and is tested on Ubuntu 16.04(xenial) and 18.04(bionic). It should also work with rails >=5.1 once you setup encrypted credentials.
Staging on Vagrant
To test out our seedified app, we are going to be using a Vagrant managed virtual machine(VM).
Vagrant is a tool for building and managing virtual machine environments in a single workflow.
Vagrant provides the tooling to build VMs declaratively and package them into boxes that can be shared to provide a consistent development or production environment. Vagrant by default uses VirtualBox to run the VMs.
Vagrantfile
Vagrant.configure("2") do |config|
  config.vm.box = "ubuntu/bionic64"
  config.vm.network "private_network", ip: "192.168.100.100"
  # config.vm.network "public_network"
  config.vm.provision "shell", path: "bootstrap.sh"
end
Here’s what this Vagrantfile does:
- configures the box(OS) to base off of
- sets up a private network and assigns a static ip to our VM
- provides a provisioning script,
bootstrap.shthat will be run the first time our VM is started
Once we have this file in our base application directory, we can start our VM with:
vagrant up
and SSH into it with:
vagrant ssh
This logs in to the VM as the vagrant user. Assuming that you used our provisioning script, you can log in as the deploy user with:
ssh deploy@192.168.100.100
To deploy our app to the VM, we only need to add the server declaration in deploy/staging.rb:
server "192.168.100.100", user: "deploy", roles: %w{app db web}, my_property: :my_value
We can then deploy our app by running:
cap staging provision
cap staging setup
cap staging deploy
Rails-seed will provide guidance on what other tasks need to be completed for a successful deploy.
Potential Issues
As of this writing, there are issues with the default Ubuntu mirror in Bionic. You might get errors about SHA checksum mismatch or Redirection loop encountered… For now you can switch to a different mirror to resolve the errors. For example, add this to your provisioning script to switch to the mirror provided by OVH:
sudo sed -i 's/http:\/\/archive.ubuntu.com/http:\/\/ubuntu.bhs.mirrors.ovh.net/g' /etc/apt/sources.list
If you do give rails-seed a try, which you totally should, feel free to reach out. We’re totally willing to geek out.